Hi, friends.
I realize that my last post, along with some poorly timed HTML issues that disallowed comments, left some of you worried, and I wanted to assure you that I am OK. After more than seven years, Ryan and I are no longer together, and I am in the process of transitioning into my new life separate from him. This has been an overwhelming adjustment, and I truly appreciate those of you who reached out or sent good thoughts my way.
Originally I thought that it would be best to stop blogging. Most all my kitchenwares and cookbooks are in storage, I am only in temporary housing, and it just seemed that perhaps cooking and blogging were too much to take on in the midst of all this chaos. But I’ve missed it. A lot. I’m starting to cook again finally, even if it was soup from a packet and Tuna Helper, but the simple act of being in the kitchen has been therapy for me. The problem is that this blog no longer suits me. I started The Not So Skinny Kitchen just around three years ago, which coincided with Ryan and I moving in together. It was as much a chronicle of our life together as it was a recipe blog, and the thought of continuing on here does not feel right. So, I’m going to move on to greener pastures in more ways than one :)
How this will affect TNSSK: I have already imported all the previous content from this blog back over to my wordpress site, and that site will live on so that all those recipes can continue to be shared and passed along. Within the next few weeks, this self-hosted site will be gone. The domain and hosting are about to expire so the site will literally disappear. If there are recipes you have bookmarked, you can still find them at the old wordpress address (https://thenotsoskinnykitchen.wordpress.com) or be sure to print them out soon!
I haven’t chosen or set up a new blog yet, but I will keep you all updated. Posting will probably not be regular for quite some time, but I enjoy this hobby too much to give it up completely. I am especially grateful to be a part of such a wonderful, supportive community. Thank you all so very much for all your comments and shared recipes over the past several years.
Much love,
Liz
Due to unforeseen circumstances, I am going to have to take a bit of time off from blogging. I know that I promised exciting things for April, but sometimes life’s events have a way of interfering with even the best intentions. During this time of personal transitions, I am going to have to devote my time and energy elsewhere.
I have truly enjoyed being a part of this community for the past couple years, and I hope you all know how much I have appreciated your friendship and shared recipes. I am especially grateful to all the CEiMBistas who has encouraged me to try new things and turned me on to wonderful flavor combinations I never would have tried on my own. This blog has been an amazing eye-opener for me, and I feel so much more brave and confident in the kitchen than I did before.
It is my sincerest hope that I will be able to return to blogging and this hobby that I have enjoyed so much very soon. In the meantime, though I may not be as regular with my comments, I will do my best to keep up with all of your kitchen adventures.
CEiMB: Crispy Cajun Fish Fingers
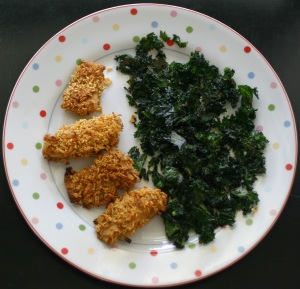
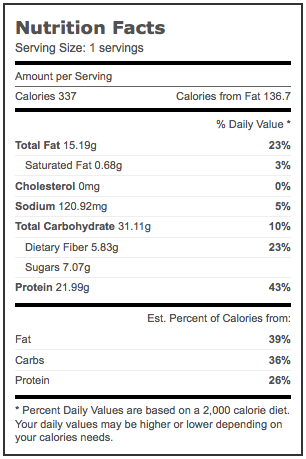
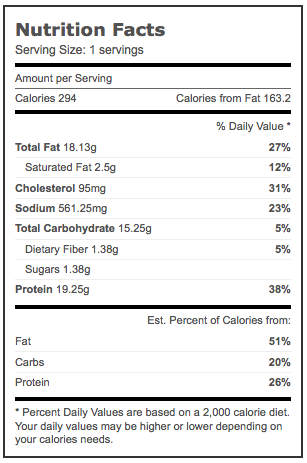
OK, I fudged a little on this week’s CEiMB recipe. We were supposed to be making the Crispy Chicken Fingers that Jennifer of The Rookie Baker chose, but I had fish thawing that needed to be used up and modified the recipe slightly. At first, my plan was just to use the fish in the chicken finger recipe, but then I remembered that Ellie has a recipe for Crispy Fish Fingers (apparently she really likes that name!). So my Crispy Cajun Fish Fingers are an amalgamation of the two recipes. And I served them alongside kale chips for a healthy twist on Fish and Chips. This meal was so, so, so, so good! I will definitely make the fish sticks again, and I cannot believe I waited so long to try these kale chips. YUM!
For the kale chips, I’m not going to post them separately for two reasons. First, they are so very, very easy to make that it seems like a stretch to even call it a recipe. Second, they’ve been featured on dozens and dozens of blogs that did a much better job with pictures and explanations than I ever could; a quick internet search will lead you to some stunning and informative posts. To make mine, I tossed about 3 cups of fresh kale with 2 teaspoons olive oil and a little Emeril’s Essence (you could just use salt and pepper or your favorite blend). Then I spread the kale in a single layer on a baking sheet and baked at 400 degrees for about 5 minutes, until lightly browned. If you use full leaves instead of the bagged, chopped stuff like I did, you might have to bake it for closer to 10 minutes. I was wary of burning them so I was watching them like a hawk.
Just a small note about the fish recipe – I have listed below the actual amounts USED in the recipe (which is how I calculated the nutritional information) but you will want to increase the amount of flour and crushed cereal slightly so that there is some excess to allow for even coating. I actually placed a whole egg, ~1/4 cup flour, and 1 cup cereal in my bowls for breading.
Crispy Cajun Fish Fingers
1/2 pound wild turbot or other white fish fillets, seasoned with Cajun seasoning if desired
1/2 large egg
2 tablespoons whole wheat flour
3/4 cup toasted corn cereal (like Chex) or cornflakes
Preheat oven to 400 degrees F.
Spray a baking sheet with cooking spray.
Cut the fish fillets into 4 X 1-inch strips.
Prep your three breading stations:
-Pour flour onto a place or shallow dish.
-Beat egg in a shallow bowl.
-Put the cereal in a sealed plastic bag and crush with a rolling pin. (I just used my hands to crumble the cereal.) Transfer the crumbs to a shallow dish.
A few pieces at a time, dip the fish into the flour mixture, dusting off the excess. Dip the fish in the egg and then the cereal crumbs.
Arrange on the baking sheet and continue until all of the fish is breaded. Spray the top lightly with cooking spray. Bake until golden and cooked through, about 10 minutes.
Banana-Oatmeal Bread
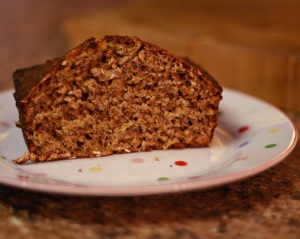
Bananas. You either love them or hate them, and I don’t really know anyone whose feelings on the subject are anywhere in between. I happen to love them. As long as they are still greenish yellow. As soon as the first brown spot appears, no thank you. Unfortunately, Ryan is the same way. This means if any bananas survive past a couple days around here, they are suddenly marked as inedible. The upside to this is that ripe bananas are perfect for banana “ice cream” or banana bread, so when I found myself with three browning bananas, I got to baking.
If you’ve been around since the very beginning of this blog, and let’s be honest, none of you have been because, well, I was basically talking to myself for the first couple months, then you might have seen a post for Banana Bread from Cooking Light. I guess you could call that my go-to recipe since I have made it several times over the past couple years, but this time I was itching to try something different. For some reason I wanted to add oatmeal, and I remembered seeing this recipe posted on Joy the Baker. I was shocked to learn that the recipe is actually from Weight Watchers; anyone who follows her blog knows how decadent and delicious-looking her recipes are! Once I realized this recipe was “healthy,” I took that as confirmation that I *needed* to make this bread. Today. And so I did.
I did substitute a little more than half the all-purpose flour with whole wheat flour but otherwise stuck to the recipe exactly because I don’t mess around with baked goods. End result? Yum! I think this was a little denser than the Cooking Light recipe, but that could be because I used the wheat flour. And, honestly, I don’t mind the density. It certainly wasn’t dry, but it wasn’t overly moist and light either. Again, that isn’t really a problem for me, but it’s worth noting in case it is important to you. Flavor-wise, however, I think this recipe is much better than the other – there is definitely a pronounced banana flavor which gives this one a bit more sweetness even though this recipe has 1/2 the sugar of the Cooking Light version. I especially enjoyed the addition of the oats. While they aren’t overwhelming, they do add a nice texture.
Do you have a tried and true banana bread recipe? Share the link!
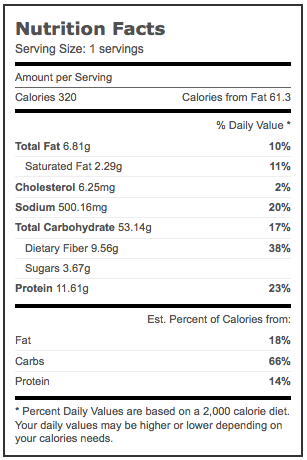
Banana-Oatmeal Bread
3/4 cup whole wheat flour
1/2 cup all-purpose flour
1/2 cup dark brown sugar
1/2 teaspoon salt
1/2 teaspoon baking soda
1/4 teaspoon baking powder
1 tablespoon canola oil
1 large egg + 2 egg whites
3 medium bananas
1 cup rolled oats
Preheat oven to 350°F. In a large bowl, stir together dry ingredients. Add oil and eggs; mix thoroughly.
In a smaller bowl, mash bananas with a potato masher or fork. Add bananas and oatmeal to batter.
Spray a loaf pan with cooking spray. Pour batter into pan and bake until top of loaf is firm to touch, 45 to 55 minutes. Remove from oven and allow to cool in pan for 5 minutes. Flip out and cool on a wire rack for another 10 minutes.
Source: Weight Watchers
yields 1 loaf

Which 'Wich? Weekend: All-in-One Breakfast Sandwich
A few weeks ago, I was contacted by Eric of Quirk Books to see if I would like to review a copy of a new cookbook by Susan Russo of Food Blogga titled “The Encyclopedia of Sandwiches: Recipes, History, and Trivia for Everything Between Sliced Bread” and of course I told him YES! As we all know, I have a slight cookbook obsession and am always on the hunt for new recipes. Not to mention that the book promises to “ensure every Panini is toasted to perfection and every Sloppy Joe is delectably sloppy.” How could I turn that down??
Since I wanted to make this fun for everyone, I will be posting a “Which ‘Wich? Weekend” (as in “Which Sandwich will Liz make this weekend?”) each weekend in April featuring a new recipe from the book. Of course, I could have just picked one, but there were too many good ones to choose from for that! Seriously, Ryan and I were both drooling over these recipes. You might be thinking, like I originally did, “how many different sandwiches can there really be?” The answer is, there are a ton. Well, two hundred and eight two pages worth at least. And the best part of this chunky little cookbook is that there is a picture of each recipe (taken by Matt Armendariz of Matt Bites)! I am so spoiled by food blogs that I really struggle with cookbooks that are full of photos, so this is a huge plus for me.
Now, on top of offering a new recipe every week, I will also be hosting a giveaway at the end of the month. Since I am enjoying this book so much and was given the opportunity to try out this book for free, I am going to pass on the love and send one lucky reader a copy of their own! Here’s how it’s going to work: Each week, with the WWW post, I will ask a question, and all you have to do to enter is answer the weekly question. At the end of the month, I will compile a list of all the answers and randomly select one winner. Obviously, the more questions you answer, the more chances you will have to win, and I might offer some bonus chances as well, so stay tuned :D
But enough chatting. On to the recipe!
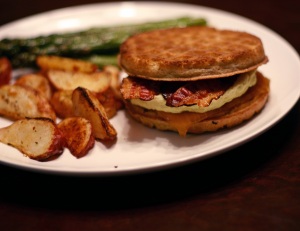
You might wonder how I chose this recipe first, and the simple truth is that it’s the first one pictured. While I am not usually a huge breakfast fan, I do enjoy breakfast sandwiches. Something about the idea of layering all the savory breakfast favorites I usually go for between two waffles intrigued me. While I wanted to stay as true to the recipe as possible, I just couldn’t get behind runny eggs, so I ended up making a “scrambled egg patty” in the microwave. I also used pre-cooked bacon and frozen waffles to keep this quick and easy. My potatoes were on the side, alongside roasted asparagus. And since Ryan was not having any part of this, he coated his waffles with peanut butter and jelly. It was a Sunday brunch fit for royalty! I wasn’t too sure about the sandwich at first, but it grew on me the more I ate. In the end, I think I’ll stick to keeping my savory bacon and eggs on one plate and my sweets on another, but that is personal preference. Ryan, on the other hand, said the PBJ version was quite tasty.
Tell me, what is the strangest thing you’ve eaten for breakfast?
All-in-One Breakfast Sandwich
2 multigrain waffles
1 egg + 1 egg white
3 strips pre-cooked bacon
1 slice sharp cheddar cheese
maple syrup (optional)
Toast waffles until golden and hot. Add eggs, bacon, and cheese. Serve drizzled with maple syrup, if desired.
Makes 1 sandwich
Adapted from “The Encyclopedia of Sandwiches,” p. 3

CEiMB: Creamed Spinach
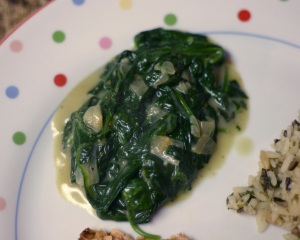
Oh, my dear CEiMB friends, I have failed you. It was my week to pick, and I’m sorry to report that I led us astray. I chose this creamed spinach recipe after seeing it paired so nicely with Porcini Crusted Filet Mignon and Herbed Mashed Potatoes (found on page 172 of “So Easy: Luscious, Healthy Recipes for Every Meal of the Week”). Ellie’s picture is beautiful and looks delicious, and my original plan was to replicate the whole meal as a special treat for Ryan. Unfortunately, that did not come to fruition and instead we were left with a slop of green mush alongside our Soy-Ginger Glazed Salmon (which I would highly recommend!) and boxed wild rice.
I like spinach. In fact, I almost love it. I add handfuls of it to salads. I enjoy it tossed with pasta. I do not, I learned tonight, like it creamed. The flavor was great; the texture was awful. I’m not sure if it was my cooking or this recipe, but neither of us made it past one bite. Maybe part of the problem is that I subbed fresh spinach for frozen, and it’s possible it got overcooked. I’m not usually a fan of frozen spinach, so I thought this would be better. But if this was better, then I am really scared of what it was like otherwise.
So, anyway, I really hope that those of you who cooked along with me did not hate this as much as we did. Blech.
After such a horrible review, I’m not sure any of you will be rushing out to try this, so I’m going to just link to the original recipe, which I followed exactly with the exception of halving the recipe and using 10 ounces fresh spinach in place of frozen. If you are a creamed spinach fan, I apologize for my harsh words against the dish, and you may find Ellie’s recipe, which I am sure is good for those people who like creamed spinach to begin with, here: Ellie Krieger’s Creamed Spinach.
Meatless Monday: Mexican-Style Brown Rice Casserole

For those of you who may be seeing this from your RSS feed reader, I encourage you to click through to the actual blog post and see what changes I was working on this past weekend. Certainly, I am no where near done… eventually I might have a little nicer header and some content in the side bar – including listings of your blogs! But I’m going to go ahead and put it up as it is for now because I am really excited about the new look. For the past two years, I had the same pink and blue theme that I started with because I just couldn’t find anything else that was really me. Well, this is it! My blog page finally reflects the actual kitchen I’m cooking in – red and slightly retro.
I am also excited to show off a couple neat little buttons up at the top of the page. Just a simple click will take you to my RSS feed, facebook or twitter page. I also added a search bar and contact form. And finally, at the bottom of each post is the option for you to share the link on a number of different social networking sites. If you feel so inclined to pass along something I said or save a recipe for another time, those buttons should help with that. Hopefully you guys will find the site easier to navigate as well as a bit prettier :D Since I am still tweeking things and trying to figure this whole web design thing out, please let me know if you have any problems or find any errors.
Now that I’ve given you a tour of all the bells and whistles that are currently available, let’s move on to the important stuff. Food.
This Mexican-Style Brown Rice Casserole was recommended to me by a friend quite a while ago, and I’m embarrassed to admit that it took me this long to actually make it. After reading her review along with a few other friends who have made it, I had really high expectations. The problem with having really high expectations is that sometimes things don’t live up to them which is what happened here. The concept is great, and I’ll definitely try this again with a few modifications. First of all, the spinach. I hate squeezing the water out of thawed spinach. And then it’s really hard to evenly distribute the spinach over the casserole because the leaves all want to stick together meaning some bites will be full of spinach and some bites will have no spinach. Personally, I didn’t mind it that much, though I am never a fan of frozen spinach. Ryan, on the other hand, hated it because of the spinach which was a little on the chewy side. So next time I make this – yes, there will be a next time – I will use fresh spinach. I skimped a little on the salsa this time (not on purpose) and would definitely be sure to use the full amount plus even more cumin next time so that the rice gets a good flavor boost.
I have to tell you, this received EXCELLENT reviews from people I trust and lots of random Weight Watchers site users, so don’t let me sorta lackluster review stop you from trying this one.
Now, did anyone notice the lovely dish in which I served this casserole? It was a gift’s from Ryan’s mom and is absolutely the cutest serving dish I have! She knows me so well – red polka dots :D
Mexican-Style Brown Rice Casserole
4 cups cooked brown rice
3/4 cup salsa (should be 1 1/4 cup!)
1 teaspoon ground cumin
15 ounce can of refried beans
10 ounce bag frozen sweet corn, thawed
4 ounce can diced jalapenos, drained
1 tablespoon chili powder
10 ounces frozen chopped spinach, thawed, excess water removed
3 ounces shredded sharp cheddar cheese, divided
Preheat oven to 375ºF. Coat a 2-quart rectangular, round or oval baking dish with cooking spray
In a large bowl, combine rice, salsa and cumin. Spoon 2 cups of rice mixture into prepared baking dish and spread out to evenly cover bottom of dish.
In another large bowl, combine refried beans, corn, peppers and chili power. Using a rubber spatula, scrape bean mixture on top of rice layer and smooth out top.
Squeeze out any excess water from spinach and then spread on top of bean layer; sprinkle with half of cheese. Top with remaining rice mixture and smooth out top; sprinkle with remaining cheese.
Place casserole on a large rimmed baking sheet to catch any spillage. Bake until heated through and cheese is browned and bubbling, about 30 minutes. Cut into 6 pieces and serve.
6 servings
Source: Weight Watchers
CEiMB: Blueberry Coffee Cake
My friend Bri over at Yoshimi Vs. Motherhood chose coffee cake for this week’s CEiMB recipe, and even though I usually shy away from anything baked, I had to cook along with her! I love fruity breads/cakes so I was really looking forward to this and was even questioning why I don’t bake more often. Well, a big pile of dishes in the sink later, and I remembered why I have this aversion to baking. I am more of an “eyeball the ingredients and dump them all into a pan” type of cook, and baking is more of a “add this to this bowl, and this to this bowl, and this to this bowl, then add a bit of bowl a to bowl c, etc.” type of activity. Inevitably, every time I do bake, I end up feeling so stressed out the whole time, and make myself read the recipe repeatedly to make sure I’m doing it all right.
I promise you this recipe is easy and does NOT require all that agitation. It’s a personal problem that maybe I will one day overcome, but in the meantime, I’ll be happy to make dinner in exchange for someone else making dessert any night of the week!
The other thing I don’t like about baking is that you never really know how it’s going to turn out as you’re making it. For example, I can taste a soup along the way, season it as needed, add more broth if necessary to change the texture, etc. With baking, it’s not that easy. Or maybe it is once you’ve gotten the hang of it, but it’s not easy for me. My batter was so sticky going into the pan that it was like a big blob that I had to use my fingers to push around the bottom of the dish. I was sure I had messed something up. Yet it turned out great!
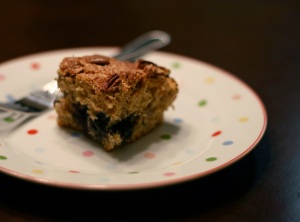
I’m not sure if I’ll be rushing to make this again simply because I still stand by the claim that baking is not for me. But, this was quite good and definitely worth making if you aren’t a weirdo like I am. It wasn’t overly sweet, but it had a nice flavor and great texture- not at all dry like some light cakes can be. I pretty much stuck to the recipe the way Ellie wrote it except that I did cut the recipe in half and use a loaf pan to make 8 squares versus a larger cake with 12 servings. I also used pecans instead of walnuts because it’s what I prefer. The only change I would make in the future would be to use fresh berries in place of the frozen because they got a little soggy during baking.
Blueberry Coffee Cake
1/2 cup all-purpose flour
1/2 cup wheat flour
1/2 teaspoon baking soda
1/4 teaspoon salt
1 1/2 tablespoons sugar
1/4 teaspoon ground cinnamon
1/4 cup chopped pecans
1/4 cup light brown sugar
1 tablespoon unsalted butter
1 tablespoon canola oil
1 large egg
1/2 teaspoon vanilla extract
1/2 cup fat-free plain yogurt
1/2 cup frozen blueberries, thawed
Preheat oven to 350 degrees F. Spray an 8-inch loaf pan with cooking spray.
Whisk together the all-purpose and whole-wheat flours, the baking soda and salt. In a small bowl, stir together the granulated sugar, cinnamon and pecans. In a large bowl, beat the brown sugar, butter and oil until fluffy. If necessary, use the back of a spoon to press out any lumps in the brown sugar. Beat in the eggs, 1 at a time, beating until fully combined. Beat in the vanilla and yogurt.
Add the flour mixture in 2 batches, stirring until just combined.
Spread half of the batter into the prepared pan. Sprinkle half of the nut mixture over the batter and top with the blueberries, gently pressing them into the batter. Spoon the rest of the batter into the pan, smoothing the top. Sprinkle the remaining nut mixture over the cake, pressing gently. Bake until a wooden toothpick inserted in center comes out clean, about 30 to 35 minutes. Let cool slightly and then unmold and allow to cool completely on a cooling rack.
8 servings
Source: Healthy Appetite with Ellie Krieger
Turkey Sausage with Fennel Sauerkraut and Potatoes
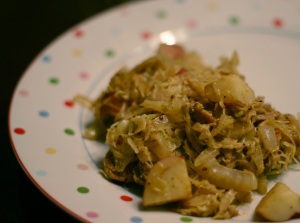
Growing up, my mom would make corned beef with cabbage and potatoes to celebrate St. Patrick’s Day. We aren’t Irish, but it just seems like the thing to do, right? The first year Ryan and I lived together, I tried to carry on this tradition, and he was a good sport about trying it. Unfortunately, he hated it. I think it’s the only thing I’ve ever made him that he has requested I never ever make again. Last year I didn’t make anything special, but apparently the fear is still there that he might come home one day to find this meal waiting for him. In fact, this year, he asked me in January, “You’re not going to make corned beef and cabbage again this year, are you?” I guess even two years later he it still scarred.
Since the traditional (in the US) St. Patrick’s Day meal is no longer an option for us, I wanted to look for something else we could try. This time I decided to ask Ryan for input so that we could both take the blame if it was a flop. After looking at a few different recipes, we decided on this dish from Eating Well’s website. As per usual, even with the best intentions, we did not end up eating this last Thursday. We ended up going out for Chinese food, and neither of us was even wearing green. Oops. I did not want to let this meal pass us by though, so I ended up making it over the weekend instead.
I honestly had no idea what to expect when taking my first bite. This is not a combination of ingredients that I have ever tried before, and it was also my first time ever cooking with fennel, so it was completely foreign territory for us which was kind of exciting. I grew up eating sauerkraut, and I have an apparently rare fondness for it. Ryan does not feel the same way, so I kept calling this “sausage with potatoes and cabbage,” hoping he wouldn’t relate the dish to sauerkraut and hate it before he even tasted it. I was pretty nervous about the results while it was cooking though because it smelled of vinegar, and I was sure he would not like it.
As we both took the first bite, neither of us knew what to think. We both said something like it’s not bad, but we weren’t sure we liked it either. After a few more bites, however, it grew on us, and we both ended up liking the meal quite a bit. I was even told that this would be a St. Patrick’s Day tradition Ryan could get behind. The flavors were a bit more subtle than I expected, which was a nice surprise. Even though it’s not something I would have ever thought of myself, everything works together really well.
Turkey Sausage with Fennel Sauerkraut and Potatoes
2 links turkey Italian sausage
2 teaspoons extra virgin olive oil
1 cup red potatoes, diced
3 cups shredded cabbage
1 small bulb of fennel, thinly sliced
1/2 medium onion, thinly sliced
1/2 teaspoon garlic powder
1/2 teaspoon fennel seed
1/2 teaspoon black pepper
1/2 cup low sodium vegetable broth
2 tablespoons white wine vinegar
1/2 tablespoon whole grain dijon mustard
Heat large skillet over medium-high heat. Add sausage and cook, turning often, until lightly browned, about 3 minutes per side. Transfer the sausage to a cutting board and slice into 1/2-inch pieces. (The sausage will not be thoroughly cooked, but it will continue cooking later.)
Add the oil to the pan and heat over medium heat. Add potatoes and cook, stirring occasionally, for 3 minutes. Add cabbage, sliced fennel, onion, garlic powder, fennel seed and pepper. Cook, stirring often, until the cabbage has wilted slightly, about 3 minutes more.
Add broth, vinegar and mustard. Stir to incorporate the mustard; bring to a simmer. Place the sausage on top of the cabbage mixture; cover, reduce heat to medium-low and cook until the sausage is cooked through and the vegetables are tender, 7 to 10 minutes.
2 servings
Source: Eating Well
